Part I – Creating and Downloading a New FPGA Design
Approximate time to complete this part: 15 minutes
This part of the tutorial will help you create a simple project to download to the XEM. This first project requires no communication between the PC and FPGA. Therefore, it can simply be downloaded to the XEM and run on its own.
The HDL describes a simple counter that outputs to the LEDs on the XEM and uses the on-board PLL for a clock.
Create Your Work Directory
For this tutorial, we’ll locate all of our files in C:\xem. You can modify this path as desired.
Start a New FPGA Project
We will start a new FPGA design using the new project wizard within Project Navigator. To do so, follow the steps below.
- Start Project Navigator
- Click File → New Project
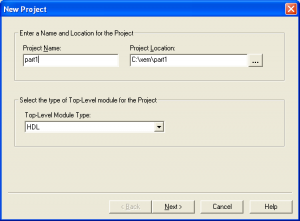
- Enter a name
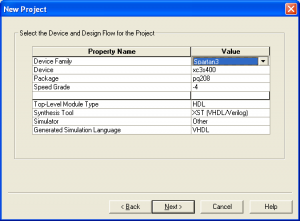
part1and locationc:\xem\part1for the project. Then click Next. - Select the Device and Design Flow (HDL using XST). Then click Next.
- XEM3001 – Spartan-3 XC3S400-4PQ208
- XEM3010-1000 – Spartan-3 XC3S1000-4FG320
- XEM3010-1500P – Spartan-3 XC3S1500-4FG320
- XEM3005-1200M32P – Spartan-3E XC3S1200E-4FT256
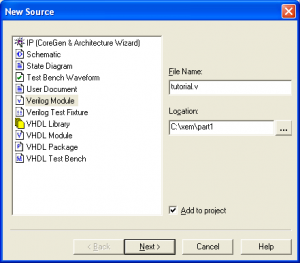
- On the Create a New Source page, click New Source to add a new source file. Choose Verilog Moduleand call the source file
tutorial.vif you would like to work in Verilog. Choose VHDL Module and call the source filetutorial.vhdif you would like to work in VHDL. Click Next.
- We will now define the pins on the
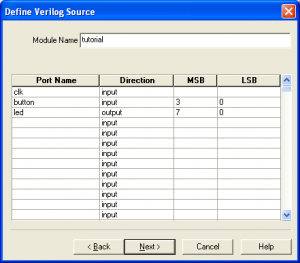
tutorial.vmodule. This is our toplevel design source, so we’ll wire it to a clock, LEDs, and pushbuttons. Enter the following ports:clk(INPUT)button(INPUT)led(OUTPUT, MSB=7, LSB=0)
- Click Next.
- For the moment, we’re done adding sources, so click Next at the “Add Existing Sources” page.
- Project information will be shown. Click Finish to complete the initial project setup.
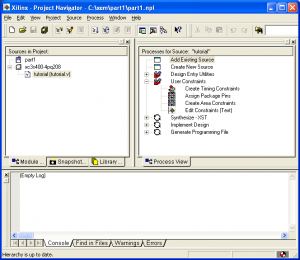
Once the new project wizard completes, Project Navigator will show the newly created project files in the pane titled Sources in Project:. The pane titled Processes for Source: “tutorial” displays the actions you can perform on these sources.
Add a Constraints File
Now that our project is complete, we are going to add a new source file that will specify the FPGA pins to be used for the ports on our new module.
Right click on the device in the Sources pane and click on New source… to add a new source file.
In the New Source dialog, select Implementation Constraints File and name the file constraints.ucf. Make sure that Add to project is checked. Then click through to complete the addition of the new source.
Now, edit the new file with a text editor by right clicking on constraints.ucf in the Sources pane, then double-clicking on Edit Constraints (Text) in the Processes pane. When the editor pops up, enter the text below.
XEM3001
NET "clk"     LOC = "P80";

NET "led<0>"  LOC = "P205";
NET "led<1>"  LOC = "P204";
NET "led<2>"  LOC = "P203";
NET "led<3>"  LOC = "P200";
NET "led<4>"  LOC = "P199";
NET "led<5>"  LOC = "P198";
NET "led<6>"  LOC = "P197";
NET "led<7>"  LOC = "P196";

NET "button"  LOC = "P194";
XEM3005
NET "clk"     LOC = "A8";

NET "led<0>"  LOC = "P14";
NET "led<1>"  LOC = "R13";
NET "led<2>"  LOC = "T13";
NET "led<3>"  LOC = "P15";
NET "led<4>"  LOC = "P16";
NET "led<5>"  LOC = "M16";
NET "led<6>"  LOC = "K15";
NET "led<7>"  LOC = "K12";

NET "button"  LOC = "C9";
XEM3010
NET "clk"     LOC = "N9";

NET "led<0>"  LOC = "V14";
NET "led<1>"  LOC = "U14";
NET "led<2>"  LOC = "T14";
NET "led<3>"  LOC = "V15";
NET "led<4>"  LOC = "U15";
NET "led<5>"  LOC = "V16";
NET "led<6>"  LOC = "V17";
NET "led<7>"  LOC = "U16";

NET "button"  LOC = "P7";
Add the HDL Source Code
We already have a container for the HDL source code (tutorial.v) which was created when we started the project. Project Navigator will automatically put bare-bones code into that shell that defines the module ports.
Edit that source file to contain the code below.
module tutorial(clk, button, led);
   input        clk;
   input        button;
   output [7:0] led;

reg [19:0] clkdiv;
reg [7:0]  counter;

assign led = ~counter;

always @(posedge clk) begin
   if (button == 1'b0) begin
      clkdiv <= 20'h00000;
      counter <= 8'h00;
   end else begin
      clkdiv <= clkdiv - 1;
      if (clkdiv == 0) begin
         counter <= counter + 1;
      end
   end
end
endmodule
Compile the Design (Generating a Programming File)
Once the HDL and Constraints files have been properly completed, the design can be synthesized and a programming file generated. To do so, select the toplevel source file in the Sources pane (tutorial.v). Then, double-click on Generate Programming File in the Processes pane.
Once the design is compiled, a Xilinx configuration file (or bitfile) called tutorial.bit will be created in the project directory. For the Spartan 3 XC3S400, this file will be approximately 208 kBytes in size.
Downloading the Design Using FrontPanel
![]()
You are now ready to download the configuration file to the FPGA on the XEM3001. To do so, start FrontPanel and connect the XEM3001 to an available USB port. When FrontPanel starts, you should see the identification string (default is “Opal Kelly XEM3001”) in the combobox at the upper right.
Click on the Download FPGA button. This will open a file selection dialog. Use this dialog to navigate to the configuration file and click Open to open and download the bitfile. Alternatively, you can use the drag and drop interface to drag the tutorial.bit file to the Download FPGA button.

Note that, after configuration, the small FrontPanel icon at the lower right of the FrontPanel application window is grayed out. This indicates that the configuration file downloaded to the FPGA does not include a FrontPanel Host Interface and therefore cannot communicate with FrontPanel on the PC. In the next part of this tutorial, we will add such capability.
