Part IV-b – ActiveHDL Behavioral Simulation of FrontPanel API
This is a brief overview of setting up a project in ActiveHDL 7.1 SP2 for Simulation of FrontPanel. For greater detail on the operation of FrontPanel Simulation, visit the full Part IV Tutorial.
This tutorial will be describing how to setup a ActiveHDL Workspace/Design in a subdirectory of the Verilog DES tutorial presented in the preceding sections. Some notes on working with VHDL are at the bottom.
Workspace and Design Setup
Begin by creating a new Workspace in ActiveHDL 7.1.
- Call the workspace name
ActiveHDL71and point the workspace folder to the DES sample root directory. This will create anActiveHDL71subfolder in the directory and store the Workspace there. - Create and empty design and the proceed.
- The default HDL language will be
Verilogand the Vendor and Technology do not need to be defined for behavioral simulation. - On the next page, the design name will be
des1. - Finish the Workspace creation.
Library Settings
- Click View→Library Manager. Then select Library→Attach Library and add the Opal Kelly ActiveHDL7.1 Verilog Simulation Library.
- Navigate to the *.LIB files located somewhere in your installed
\FrontPanl\FrontPanelHDL\ActiveHDL7.1\directory. There should be one for Verilog (okFPsim_ver.LIB)and one for VHDL (okFPsim.LIB). Make sure you attach the one required for your simulation (Verilog here). - Close the Library Manager. Now under Design→Settings, navigate to the Verilog menu and under Verilog Libraries click the Add Library icon. Hold down the Ctrl button on your keyboard and select okfpsim_ver and ovi_unisim.
- Select OK.
Adding Files and Setting Top Level
- Double click Add New File in the Design Browser and begin adding files to the design. The following files should be added in the order listed. They can be dragged into order at anytime. Check that Make local copy is deselected if you want to edit/work with the original files.
key_sel.vcrp.vsbox1.vsbox2.vsbox3.vsbox4.vsbox5.vsbox6.vsbox7.vsbox8.vdes.vdestop.vdes.dodes_tf.vglbl.v(can be found in your Xilinx ISE directory in\verilog\src
- Right-click on any of the source files and choose Compile All.
- Now, expand the compiled local library, (des1 library in this example. Holding down the Ctrl button once again, select
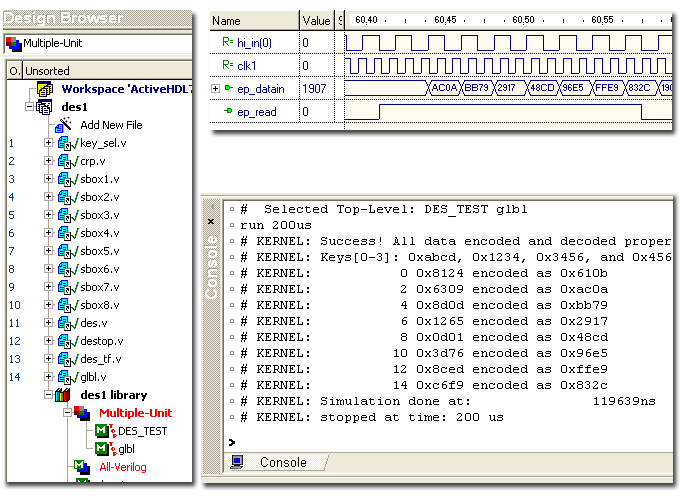
DES_TESTandglbl. Right-click on either selected word and select Set as Top-level. You’ve just created a multiple top-level. - Select Simulation→Initialize Simulation and everything is set. Create waveform windows, add signals, and experiment!
VHDL Design Simulation Notes
- Click View→Library Manager. Then select Library→Attach Library and add the Opal Kelly ActiveHDL7.1 VHDL Simulation Library.
- Any file that has Opal Kelly modules will need the following lines added:
library okFPsim;
use okFPsim.all;